The Print Room
Welcome to the ‘Print Room’. Here I have collated a guide to home printmaking techniques for all ages. I hope it might inspire printing at home or fill a few hours at home-school….
Home printmaking tools & materials
Printmaking at home requires resourcefulness and inventiveness. You may not have everything you need but you can always improvise. The most successful printmaking starts with good preparation. Start by putting together your own unique home printmaking kit. The techniques below include materials list. Look around you, see what you can find in your homes, gardens and off the streets that you can “ink up” and print with. Think of your home printmaking kit as a way of reusing or re-purposing everyday materials. Something that may be considered rubbish to one person can be used to create printed works of arts.
Setting up your home printmaking space.
Printmaking can take up a lot of space and be messy, but with preparation, you can easily print at home. Think about how you will set up your own temporary printmaking space. It doesn’t have to be any more than a table or work surface. Make sure you organise your printing area according to your workflow. Where will you place your clean paper and inks/paint. Think ahead and make room to lay out your finished prints to dry. You also need to plan where to lay down inky paint brushes, rollers and tubes of ink/paint. How will you keep things clean while you’re working and what do you need to clean up with at the end of your session?
-
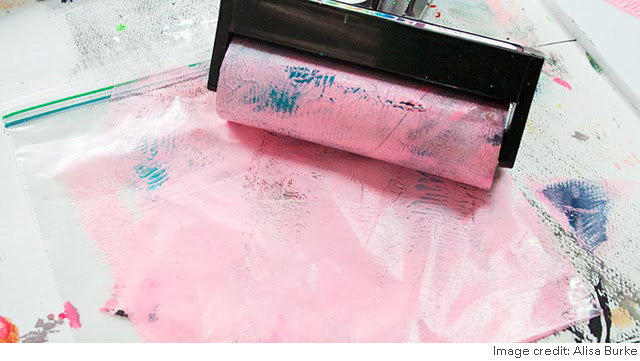
A mono print is a single print taken from a design created in paint or printing ink usually on glass. The technique below uses a plastic bag in place of glass.
Materials.
Plastic bag
Printing ink or Paint
Roller or paint brush
Tools to create marks – comb, cocktail sticks, paint brush , pencil, knitting needle, cotton wool bud, rags
Paper to print on.Instructions
1. Start by “inking up” a plastic bag with either a roller or a paint brush.You can use printing ink, acrylic paint, left over emulsion or even fabric paint if you wish to print onto fabric surfaces.2. Experiment with different ways to create marks on the ‘inked up’ plastic bag. You can scratch into the paint with a cocktail stick, old paint brush or the end of a pencil. You can pull paint away (subtractive method) with a cotton bud or a rag. You can also add paint and brush strokes to the surface.
3. When you are ready to print place plastic bag onto your paper or fabric. If you have a roller roll over it a couple of times, if you don’t have a roller gently smooth over with the palm of your hand. Then peel the bag away from the paper/fabric.
4. If there is still enough ink/paint on the bag you may be able to get a second print- called a “ghost print”.
5. Once print is dry think about adding another layer of print and colour on top to create a print full of colour and texture. Repeat if inspired.
Technique credit: Alisa Burke, watch her video

-
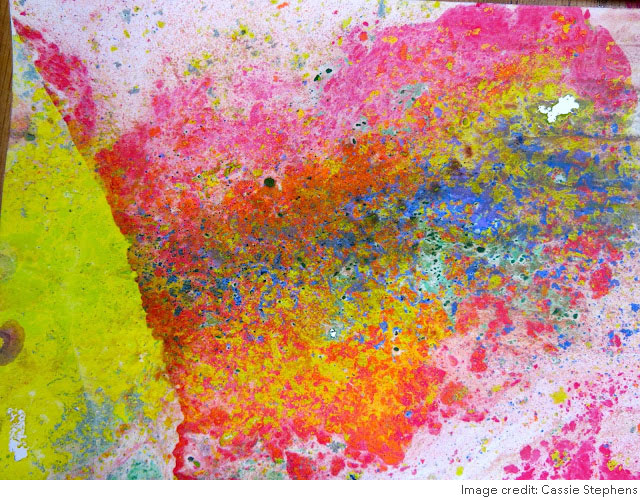
Marbling is a method of aqueous surface design, which produces patterns similar to smooth marble. The technique below uses chalk however the link at the bottom of this section explains 6 other methods including using shaving foam or nail polish !
Materials
A shallow tub that your paper fits in.
Chalk (preferably fat sticks),
Water
Something to scrape the chalk (knife or scissors works)
A comb or fork (to stir the chalk),
Heavy weight white or coloured paper.
Tray or somewhere flat to dry your print
Rubber gloves because the chalk may stain.
Fixative or hair spray (works just as well )Instructions
1. Fill your tub with a centimetre or two of water.2. Hold the chalk over the water and scrape in whatever colour chalks you want. ( If you accidentally break the chalk into the water, do not fish it out, you will break the tension on the water and the chalk sprinkles will sink.)
3. Stir with an old comb or whatever you have to create your design.
4. Hold the paper in a U shape, set the paper in the water centre first. Slowly let the edges go onto the water.
5. Let it sit for 30 seconds. Grab the corners of the paper closest to you and drag the paper off the water. Place it onto tray to dry.
6. Your marbled paper should dry in a about half an hour. Once dry spray with a fixative/ hair spray so the chalk won’t rub off.
How to Marble : 6 easy techniques with Artful Parent
-
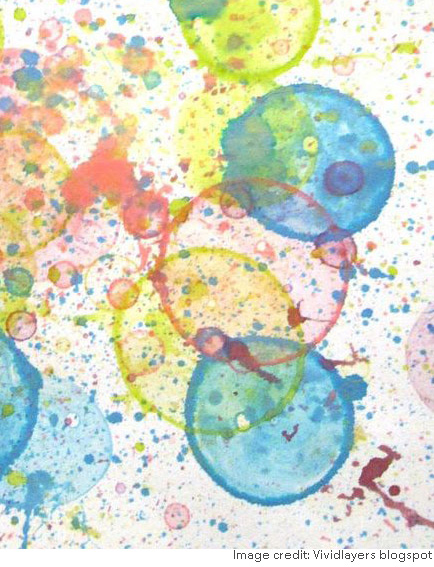
Bubble prints are made by colouring bubble solution, blowing bubbles, and pressing paper onto the bubbles.
Materials
Washing up liquid.
Food dye, ink or paint
Bowls or containers
*Bubble wand to blow bubbles
Drinking straw to blow bubbles
Paper*Homemade bubble wands. If you don’t have a wand from a shop-bought pot of bubbles, you can bend paperclips or pipe cleaners.
Instructions
1. Fill each of your containers with about half a cup of water.2 . Add 1 tablespoon of washing up liquid into the water and stir
3. Add 10 drops of food colouring or ink to the bubble mix and stir well. Then either …
4 . Place your bubble wand in the coloured bubble mix, remove and blow bubbles towards your paper. As the bubbles hit the paper and pop, they will leave an interesting pattern.
5. Or alternatively use a straw to blow bubbles above the rim of the container.
6. Bubble print your paper by lightly touching the bubbles with your paper until they pop.
7. Leave your prints to dry. To flatten prints, place under a heavy book on a flat surface after they have dried.
-
Before trying out the ideas in this section you may want to make ‘stamp pads’ out of sponges or material to use when printing your found objects. Click here for instructions.
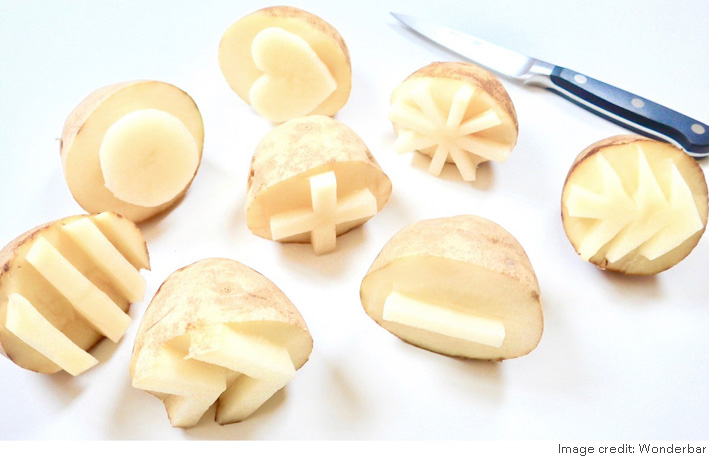
Potato Block Prints
Block printing is a printing technique using a carved material covered in ink in this instance you will use a potato
Materials
Potatoes
Paint to print with or stamp pad (made earlier)
Cutting tool to cut design into potato.
Paper to print on
a magazine to use as a pad, the softness of the magazine pad will make clearer, crisper prints.Instructions.
1. On some scrap paper plan a few simple designs.2. Depending on the size of your potato cut a potato in half or into thick slices.
3. Carefully use a sharp knife to cut shape designs around 1.5cm deep into the potato. Alternatively you can use shaped pastry or cookie cutters
4. Pat the potato stamp dry with a tissue.
5. Either use a wet paintbrush to apply the paint to potato or press potato into your stamp pad.
6. Firmly press the potato onto a piece of paper for about three seconds.
7. Slowly lift the potato from the paper.
8. Repeat to make a pattern.
For potato printing ideas from Becoration click here.
How to make a potato print without using a knife with Met Museum here.
Cardboard Roll prints
There are a few different ways to use cardboard rolls to print.
Materials.
Cardboard rolls
Paint
String
Bubble wrap
ClingfilmInstructions
1. Dip in paint and use as a stamp, a quick and easy way to print circles.2. Bend or manipulate the cardboard roll into simple shapes.
3. Cover the cardboard roll with bubble wrap, paint the bubble wrap and roll over the paper to make polka dots.
4. Wrap string or wool round the cardboard roll. Paint and then roll texture onto paper.
5. Use scrunched up cling film around a roll, cover in paint and roll onto your surface.
Technique Credit: Alisa Burke
Click for further instruction from Alisa Burke
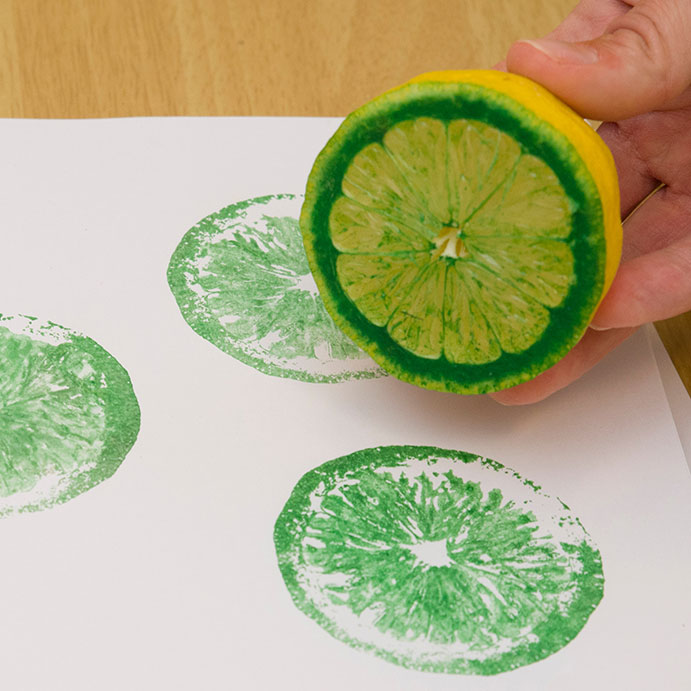
Lemon print . Image credit: Chicagobotanic.
Click here for more Fruits & Veg Print ideas
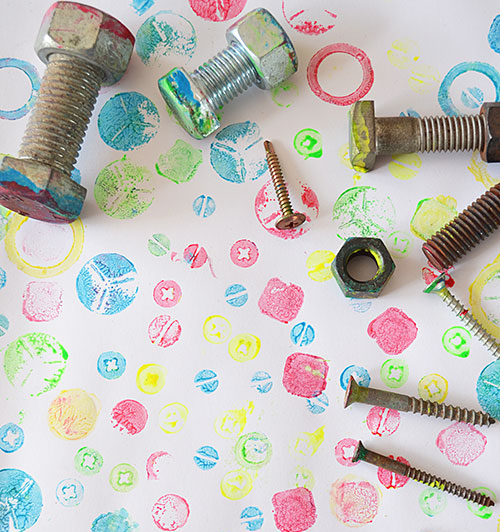
Nuts & bolts print. Image credit: Picklebums
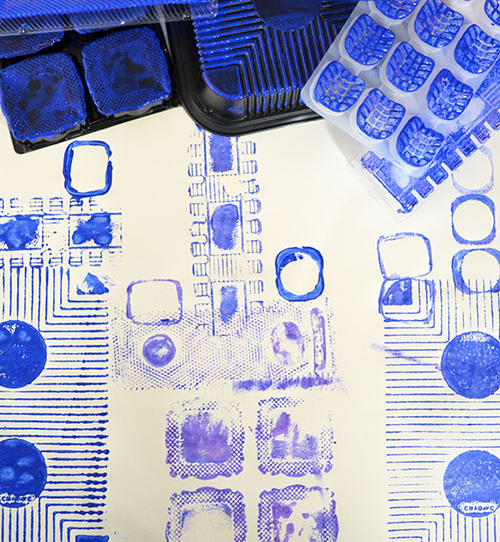
Recycled Container Print.
Rollers are the easiest way to apply paint to the bumpy surfaces but you could use a paint brush, or try dipping the containers into a large tray of paint. Technique & image credit: Picklebums
-
Rubber Relief Printing, is a method where a rubber/eraser that has had felt tip ink applied to its surface, but not to any recessed areas, is brought into contact with paper.
Materials
Rubbers (erasers )
Felt tip pens
Cutting tool to cut design into rubber.
Paper to print on
a magazine to use as a pad. The softness of the magazine pad will make clearer, crisper prints.Instructions
1. On some scrap paper plan a few simple designs. Avoid trying to carve fine detail, you might get frustrated. Keep in mind that your carved image will print in reverse so plan your design accordingly, especially when working with numbers and letters. You can use tracing paper to reverse your image onto your rubber, if needed.2. Choose a design to draw onto the rubber with a pencil or black marker.
3. Cut out the lines or the spaces between the lines with your carving tool. Remove any bits of rubber caught in the cut-away areas with an old toothbrush.
4. Place your piece of paper on the magazine pad.
5. Use coloured felt tips to colour over the design on your rubber. Work quickly so your felt tip pen ink does not dry.
6. Press the carved side of the rubber down firmly on the paper, hold for a second, and lift in a straight-up motion. Check to see that the lines are printed clearly. If not, make repairs by trimming where necessary.
7. Apply more colour, and print again. The felt tip must be reapplied before each print is made.
8. Experiment with different colours by wiping off the rubber with a damp cloth and drying it well. Apply new colours and test again. Start off simply with one colour, then choose up to four coloured felt tips to fill in the different sections of your design on the rubber, use the lighter colours first.
-
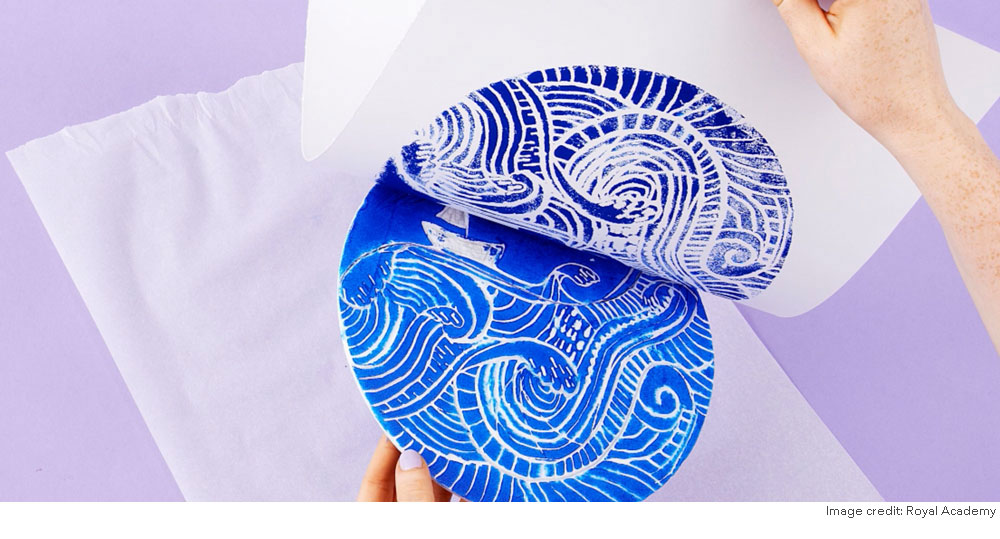
Polystyrene Relief printing, is a method where a piece of polystyrene that has had ink applied to its surface, but not to any recessed areas, is brought into contact with paper.
Materials
Polystyrene – pizza bases, plates or food containers made of polystyrene.
Water-based printing ink, watered down acrylic or emulsion paint,
Something to roll the paint onto, a paint tray, plastic bag , piece of cardboard or glass tile.
Something pointy (but not too sharp) to carve into the polystyrene a blunt pencil, knitting needle, ballpoint pen with a lid on it, or the end of a paintbrush.
Instructions:
Click here to follow great instructions from the Royal Academy website.Technique & image credit: Royal Academy
-
A collagraph is made by glueing different materials to cardboard and creating a kind of collage. During the inking process the ink will rub off surfaces that are smooth or higher and stay on surfaces that hold more ink, thus creating the image. This is a little more complex home print technique and will require a little more patience and practice. You may not be able to carry out the inking up techniques exactly as shown in the instruction links below but I think the idea of making a collaged plate to print with can easily be experimented with.
Materials – Collagraph
Flat textured materials for example -leaves, seeds, string, acrylic, crushed paper, bubble wrap, sandpaper, cardboard, pressed flowers, grasses.
Cardboard.
Pva
Varnish.
Rags.
Ink
Roller or paint brush.Instructions: Click here to follow instructions from ‘Handprinted.co.uk’
Materials – Card Cut Collagraph
Mount board
Masking Tape
Shiny parcel tape
Scalpel
Ink
Roller or paint brush
RagInstructions : Click here to follow instructions from ‘Handprinted.co.uk’